GitHub Enterprise Integration
You can integrate PrivX with GitHub Enterprise to authenticate git commands using PrivX SSH certificates.
Overview
The integration requires:
- Configuring GitHub Enterprise to trust certificate-based authentication from PrivX.
- Enabling Bastion connections via ProxyCommand to allow automatic authentication via PrivX.
- Adding GitHub Enterprise as a connection target in PrivX.
Both PrivX and GitHub Enterprise must be configured in order to support certificate-based authentication.
GitHub Enterprise Configuration Steps
-
Configure GitHub to accept certificate authentication from PrivX:
-
Configure your organization to accept certificate-based authentication requests, as explained here.
-
Set the PrivX CA certificate as a trusted CA key:
To obtain the PrivX CA certificate from the PrivX GUI, go to Administration→Deployment→Deploy and Configure SSH target hosts, select Configure manually, and copy the CA certificate shown in Step 5. Then, add the certificate information to your organization or enterprise account as explained here.
-
-
Configure GitHub Enterprise user accounts for PrivX access:
As defined in PrivX's OpenSSH certificate template, the Windows Username of each user (with host) is set as the certificate Key ID for GitHub authentication via SSH (
%W@%Hin the template).Ensure that:
- One or more GitHub user account exists for the PrivX users.
- The GitHub usernames match the PrivX attributes used for the certificate Key ID.
GitHub Enterprise Server also supports LDAP integration, which can help synchronize user accounts between PrivX and GitHub.
infoYou may customize certificate templates to use different PrivX user attributes instead of the default Windows Username. For details, see SSH Certificate Templates.
PrivX Configuration Steps
-
Create a PrivX role for GitHub access:
In the PrivX GUI, go to Administration→Roles, then click Add Role.
Define the role name, mapping rules, and access restrictions as needed, then save the role.
-
Add GitHub as a connection target (host):
In the PrivX GUI, navigate to Administration→Hosts, and click Add Host.
Provide the address and host key of your GitHub server -- use
github.comfor GitHub Enterprise Cloud. Under Certificate template, select GitHub Enterprise: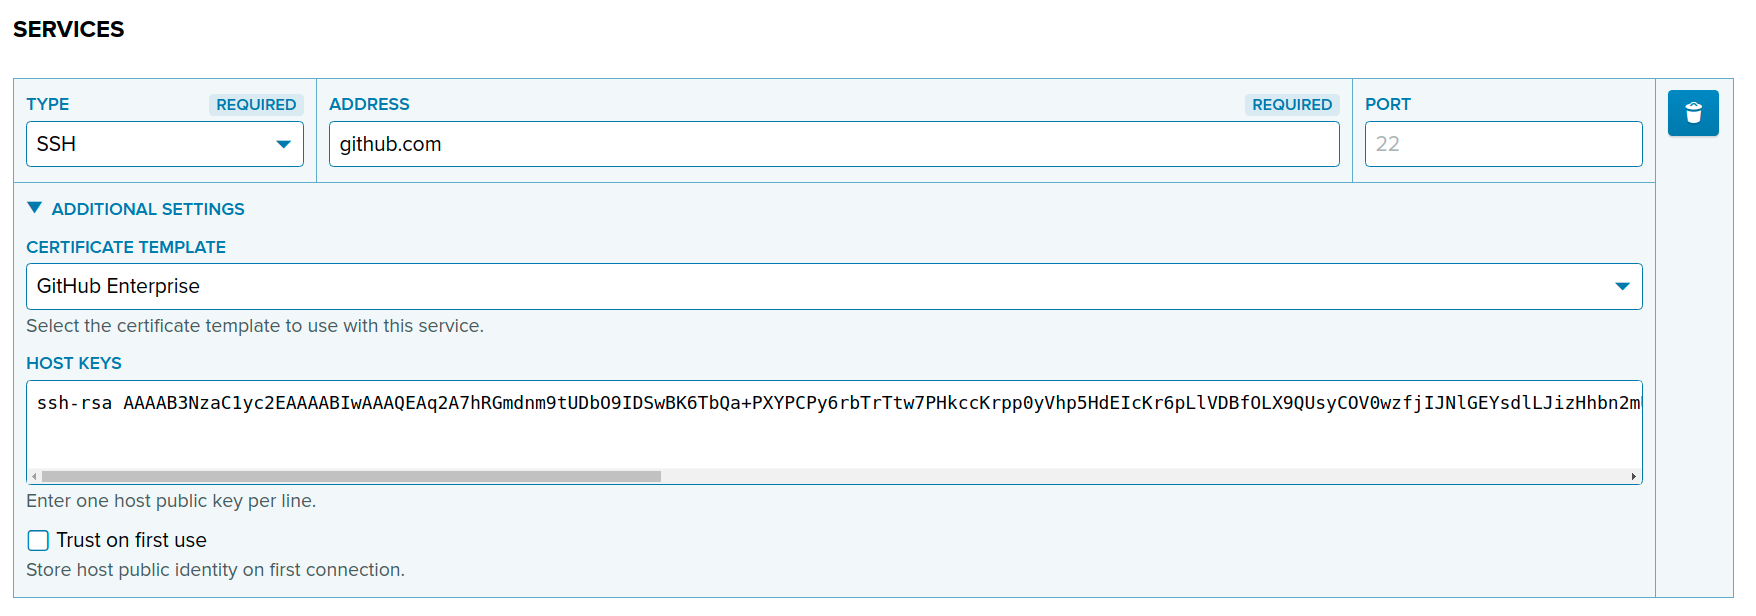
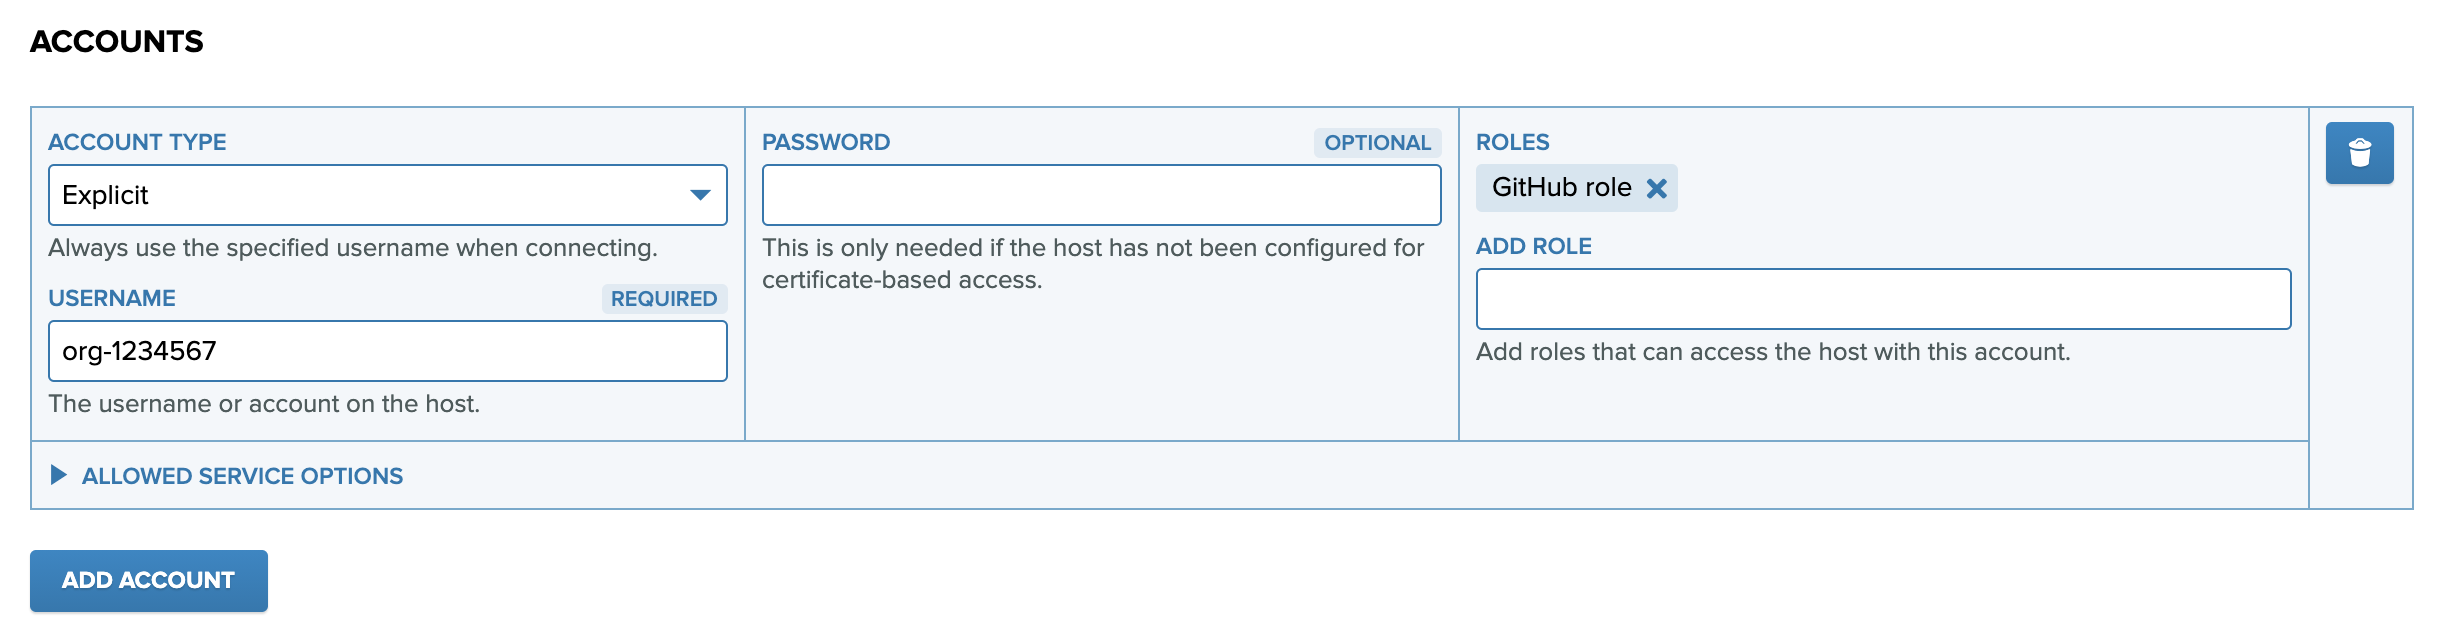
Then, add an account to the host with the following settings:
- Account type: Explicit
- Username: Organization ID
- Password: Leave empty (PrivX will use certificate-based authentication)
- Roles: Assign the GitHub access role you created
Click Save to finish adding the host.
cautionThe username here is not the GitHub organization name, but the organization ID, prefixed with
org-.You can find the organization ID in the GitHub organization dashboard. If it's not visible, you can retrieve it via the GitHub API:
- Create a personal access token with the
read:orgpermission. - Use the following command to fetch the ID:
curl -H "Authorization: token [your-token]" https://api.github.com/orgs/[your-org-name]The response will include a field like
"id": 1234567. In this case, the PrivX username would beorg-1234567.infoInstead of using an Explicit account type, you can assign a Directory account. This requires additional configuration. For details, see Active Directory Integration.
-
Grant GitHub access to users:
For each PrivX user who needs access to GitHub:
- Assign the user to the GitHub role you created earlier.
- Ensure the user can connect via the PrivX SSH Bastion using ProxyCommand, as described in Connecting Directly Using ProxyCommand.
-
Test SSH access through PrivX:
From a PrivX user machine, use the following command to test the connection, replacing
{PRIVX_SERVER_ADDR}and/path/to/your/.ssh/private_keywith appropriate values:# If you provided the Bastion configuration options in the client's SSH configuration:ssh org-1234567@github.com# If you haven't, provide the configuration options in the 'ssh' command:ssh -o "IdentityFile /path/to/your/.ssh/private_key" \-o "HostKeyAlias {PRIVX_SERVER_ADDR}:2222" \-o "ProxyCommand nc -X connect -x {PRIVX_SERVER_ADDR}:1080 %h %p" \org-1234567@github.comExpected output (considering that the GitHub user that logged in is
jdoe):PTY allocation request failed on channel 0Hi jdoe! You've successfully authenticated, but GitHub does not provide shell access.Connection to github.com closed.Once verified, you can start using Git:
git clone org-1234567@github.com:git-org-name/test-repo.git
Active Directory Integration
When multiple users need access to GitHub, manually creating an Explicit host account for each user can be inefficient. Instead, you can configure PrivX to use Directory accounts mapped from an external directory, such as Active Directory (AD), and assign them dynamically to GitHub users.
This section explains how to modify Steps 2 and 3 of the previous PrivX Configuration to support Active Directory integration.
Steps for AD Integration
-
Step 2: Add the GitHub host as a connection target, just as before. Then, when adding an account to the host, use the following settings:
- Account type: Directory
- Username Attribute:
git_account - Password: Leave empty
- Roles: Assign the GitHub access role you created
-
Step 3: Update the GitHub access role to automatically include your AD users:
- Go to the role details, and add a Mapping Rule that matches the appropriate AD users.
- Ensure users can still connect via the PrivX SSH Bastion using ProxyCommand, as explained in Connecting Directly Using ProxyCommand.
In addition to these changes, two other configuration steps are required:
-
Set a user attribute in AD for SSH login:
Ensure each relevant AD user has an attribute whose value is your Organization ID prefixed with
org-(e.g.:org-1234567). This will be used as the SSH username when connecting to GitHub. -
Map the AD attribute in PrivX:
In the PrivX GUI, go to Administration→Directories, select your AD directory, then go to Attribute Mapping and map the AD attribute (e.g.,
comment) containing the Organization ID prefixed withorg-to the internal PrivX attributegit_account(e.g.,comment=git_account).infoYou may also need to update the LDAP Attributes Filter in the Role Store settings to include the attribute used for
git_account. To do this, go to Administration→Settings, then select Role Store from the dropdown menu and change the necssary settings.
After performing these steps, continue with the normal configuration, as explained in the previous section.