PrivX Authorizer
PrivX Authorizer is a mobile app that allows PrivX users to:
- Approve multi-factor authentication (MFA) requests when logging in to PrivX.
- Approve or deny role requests assigned to them through PrivX workflows.
Mobile approval of role requests requires PrivX Authorizer 2.0.0 or later. PrivX Authorizer 1.7.x supports MFA login approval but does not support role request approval.
| App Version | MFA Login Approval | Role Request Approval |
|---|---|---|
| PrivX Authorizer 1.7.x | Supported | Not supported |
| PrivX Authorizer 2.x.x | Supported | Supported |
PrivX Authorizer 1.7.x remains compatible with existing MFA functionality. We recommend users to upgrade to PrivX Authorizer 2.0.0 or later to approve role requests from the mobile app.
Prerequisites
PrivX Authorizer requires:
- A PrivX online license with the Mobile Gateway feature enabled.
- Network access from the PrivX servers to the PrivX Mobile Gateway endpoint at
https://mobilegw.privx.io:443. - A PrivX deployment registered with the Mobile Application Gateway.
Mobile approval of role requests additionally requires:
- A PrivX online license with the Mobile Approval feature enabled.
- A paired mobile device with PrivX Authorizer 2.0.0 or later installed.
- An active mobile approval subscription for the paired device.
- The required role to approve the workflow step.
To use PrivX Authorizer:
- Set up PrivX Mobile Gateway.
- Register PrivX with the Mobile Application Gateway.
- Install PrivX Authorizer and pair the mobile device with PrivX.
- Configure one or both of the following features depending on your PrivX Authorizer version:
- Multi-factor authentication: Enable PrivX Authorizer as the MFA method for the required user directories.
- Role request approval: Enable mobile approval for the required workflows. Approvers must also subscribe each paired device that they want to use for mobile approval.
After setup, users can verify login requests with PrivX Authorizer. Subscribed approvers also receive notifications about pending role requests and can approve or deny them in the app.
Setting Up Mobile Gateway
MFA with PrivX Authorizer relies on the PrivX Mobile Gateway cloud service. The service is operated by SSH Communications Security.
The Mobile Gateway endpoint mobilegw.privx.io is hosted behind Amazon API Gateway and uses dynamic IP addresses. Before you begin, ensure that your PrivX servers can:
- Resolve the Mobile Gateway IP addresses.
- Complete TLS handshakes and validate the certificate for
mobile.gateway.privx.io:443.
For environments that do not support dynamic IP addresses, configure your PrivX to a static Mobile Gateway endpoint in Administration → Settings → Global and under Mobile Gateway Endpoint enable the Use Static IPs setting.
When Use Static IPs is enabled, PrivX Servers use fixed.mobilegw.privx.io as the Mobile Gateway endpoint to resolves to the following two static IP addresses:
- 34.246.145.86
- 34.241.193.96
Restart PrivX to apply your changes. Ensure that your firewall rules allow the PrivX servers to access these IP addresses.
To minimize the storage of sensitive information, PrivX Mobile Gateway collects only the following data:
| Data Type | Description | Example Value |
|---|---|---|
| PrivX product key | Hash value of a public key per PrivX installation | product-sha256-sS6ACFY-QF5MArxe2Twr9Gxm0ImED1_YdDca5bpAh60 |
| PrivX user key | Hash of a user ID in a PrivX Server | da313ca13cd81fcb04fc8a95d5edc05ae8010203 |
| Mobile device key | Hash value of public key of PrivX Authorizer app | mobile-sha256-cKPwKD4IirMnXa_WDaixd4PKSZ4KlvkJhGTo4WTyduU |
| Device name | Hardware model of the mobile device | iPhone 14 Pro |
| Device OS | Device OS and version | iOS 17.2 |
Registering PrivX with Mobile Application Gateway
PrivX Authorizer requires connectivity to the PrivX Mobile Gateway cloud service. The service is operated by SSH.
To register your PrivX deployment with the Mobile Application Gateway, go to Administration → Deployment → Mobile Application Gateway and select Register.
Setting Up Licensing for PrivX Authorizer
Ensure that your PrivX online license includes Mobile Gateway. If you plan to use mobile approval of the Role Requests feature, the license must also include Mobile Approvals.
To view the enabled features, go to Administration → License. For more information, see Licensable Features.
Pairing PrivX Authorizer
To pair a mobile device with PrivX:
-
Download PrivX Authorizer from Google Play or the App Store.
-
On first launch, enable notifications and select Continue to App. Allow camera access if prompted.
-
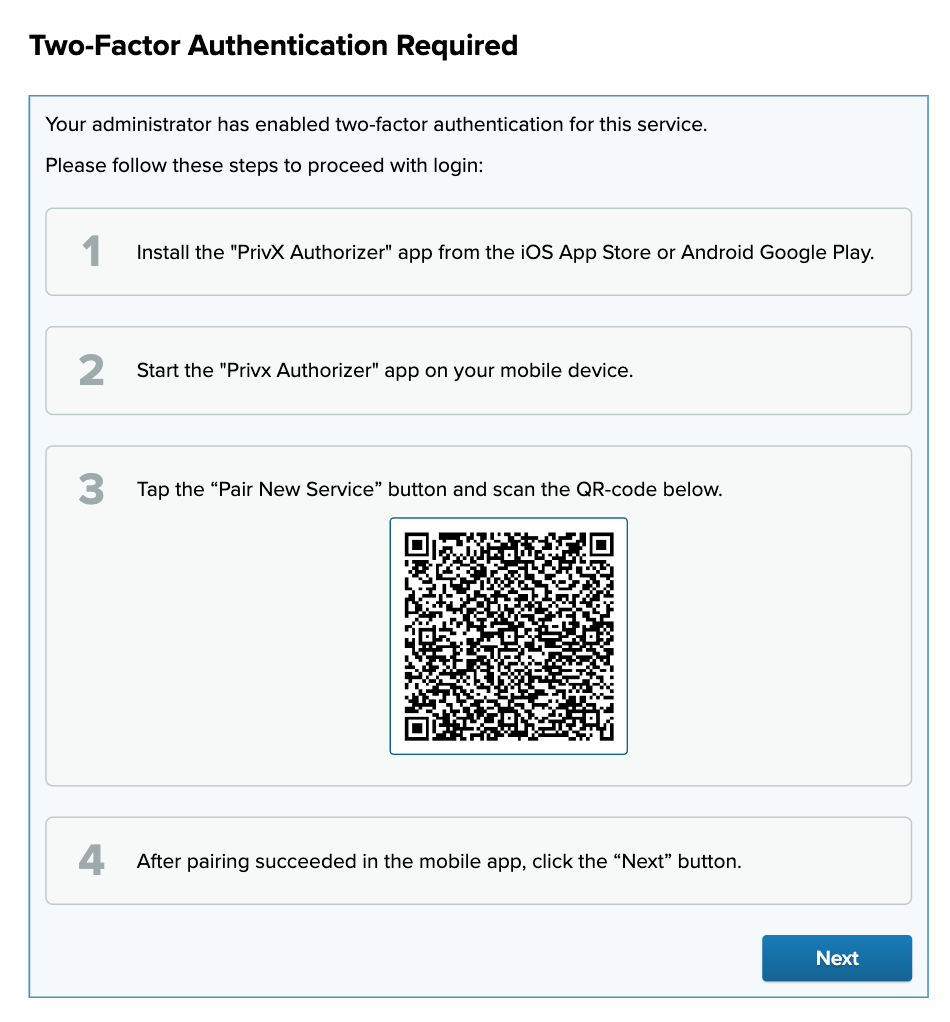
In the PrivX Web UI, go to your Account page. Under Credentials → Paired Devices, select Pair New Device. PrivX displays a QR code. If MFA is required for the account, PrivX displays a pairing QR code the next time the user logs in.
-
Open PrivX Authorizer on your mobile device and select Scan QR Code. If the app already displays My Services, select Add New Service instead. Allow camera access if prompted, then scan the QR code displayed in the PrivX Web UI.
-
On Pair This Device, verify that the service and account details are correct, then select Pair This Device.
-
Keep PrivX Authorizer open while pairing completes. The app displays Pairing Complete, then shows the paired PrivX service under My Services:
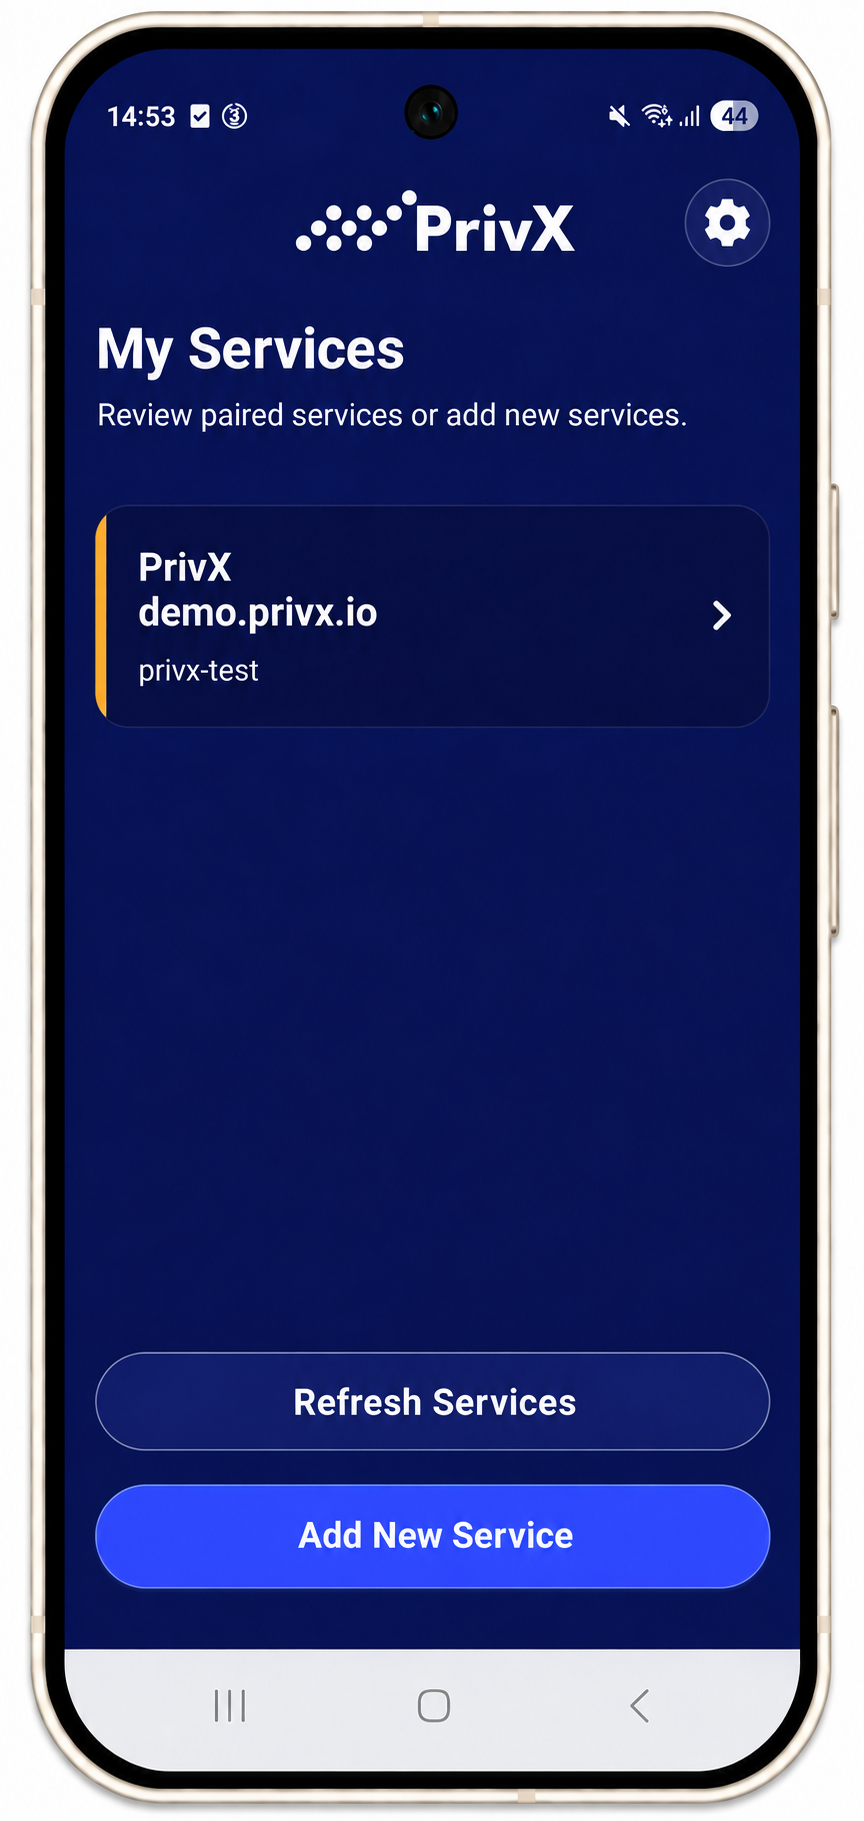
PrivX Authorizer lists paired PrivX services under My Services. Select a service to view its pending requests. Depending on your configuration, these can include sign-in requests and role requests.
Managing Paired Devices
You can manage paired devices in the PrivX Web UI, on the Accounts page, under Credentials → Paired Devices:
- Subscribe to/Unsubscribe from Role Requests
- Unpair Device
- Test Login
Unpairing a device removes its mobile approval subscriptions and request information. If the device is paired again by the same user or another user, information from the previous pairing is not available. Subscribe the new pairing separately to receive role approval requests.
The screenshots show PrivX Authorizer on Android. The interface may differ on iOS and between application versions.