ICAP Servers
You can integrate PrivX with a server that supports the Internet Content Adaptation Protocol (ICAP) to scan files transferred during user connections for viruses and prohibited content. ICAP scanning is not supported for RDP native-client connections or for web-based and native-client VNC connections.
Use the following table to verify support for your server, mode, and connection type and to check whether TLS compatibility has been confirmed:
| Category | Support Details |
|---|---|
| ICAP servers | ClamAV ClearSwift SIG McAfee Spectra Detect ICAP WithSecure Atlant |
| ICAP modes | REQMOD RESPMOD |
| Connection types | SSH through the PrivX Web UI SCP with native clients SFTP with native clients RDP through the PrivX Web UI Web file transfers between the Carrier browser and users |
| TLS compatibility | McAfee Spectra Detect ICAP TLS compatibility with other supported ICAP servers is not guaranteed. |
Enabling ICAP for File Transfers
When ICAP scanning is enabled, PrivX scans all uploaded and downloaded files. PrivX scans uploaded files before sending them to target hosts and also scans downloaded files before transferring them from the shared directory to users' machines. PrivX blocks files that do not comply with corporate policy.
Before you begin:
- Make sure the ICAP server host name and port are accessible from all PrivX Servers.
- For faster scanning, place the ICAP server close to the PrivX Servers and provide a fast network connection between them.
To set up ICAP:
-
In the PrivX Web UI, go to Administration → Settings → Global. Click Edit and in the ICAP section, configure the following settings:
- Select one or more file-transfer scanning options according to the types of file transfer used in your environment: through SSH Proxy, SSH Bastion, or RDP Proxy. The File transfer scans for RDP Proxy checkbox also applies to HTTPS file transfers through Web Access Gateway.
- Enter the ICAP server host name in ICAP Server Hostname and the port number in ICAP Server Port.
- To use response modification, enter the URL in ICAP RESPMOD URL. To use request modification, enter the URL in ICAP REQMOD URL. Verify the correct value in the ICAP server configuration. For ClearSwift SIG, enter
clearswiftin ICAP RESPMOD URL; do not enter a URL. - [Optional] If the ICAP server requires a service name, enter it in ICAP Service Name. For example,
squidclamav. - [Optional] To use TLS, select the TLS Enabled checkbox. By default, PrivX uses the CA certificate bundle at
/etc/pki/tls/certs/ca-bundle.crtto verify the ICAP server certificate. If the certificate cannot be verified, add the required trust anchors to ICAP Server Certificate Trust Anchors.
-
Click Save and then Restart to restart PrivX and apply your changes.
The following example shows an ICAP configuration in the PrivX Web UI:
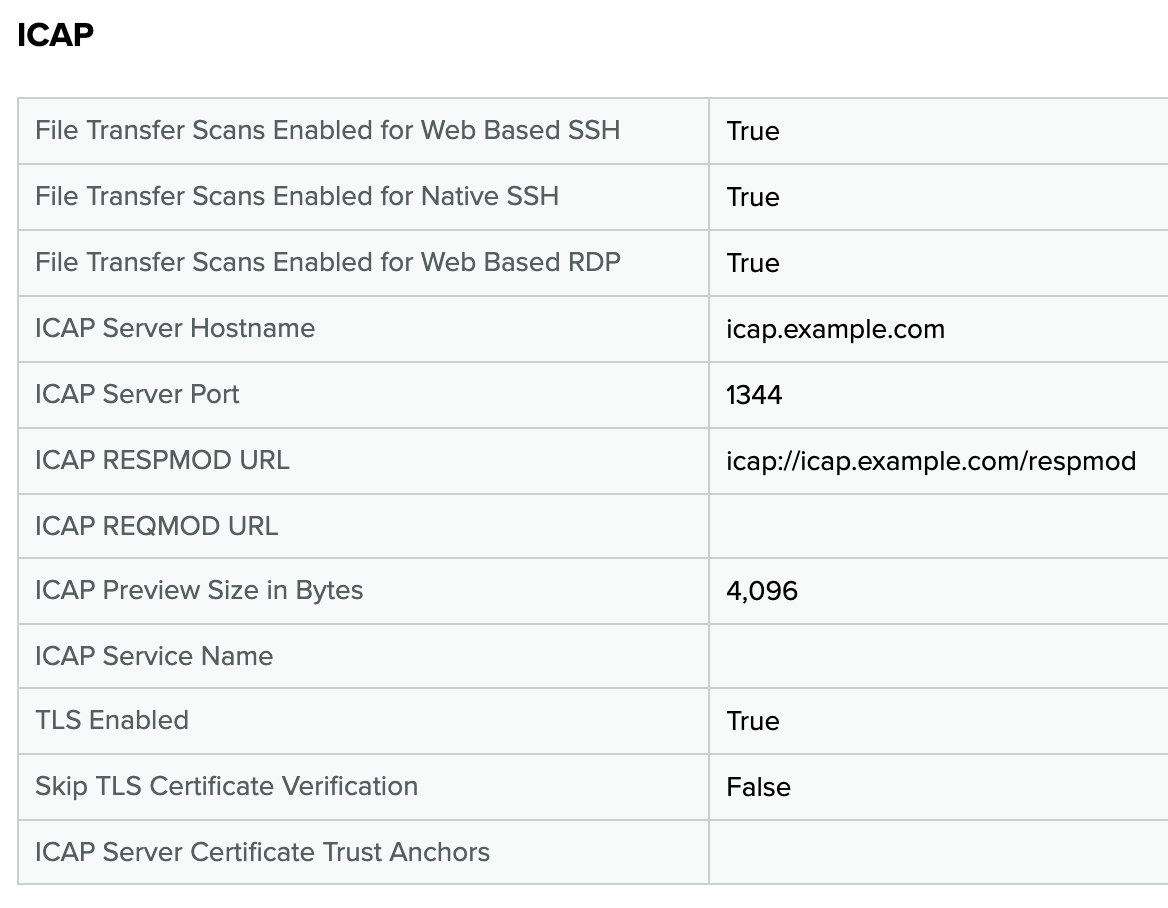
If an internal error prevents PrivX from starting an ICAP scan of an intercepted SCP or SFTP file transfer through SSH Bastion (for example, the scan directory cannot be accessed), PrivX logs the error and sends the Internal ICAP scanning error message to the native SSH client. The Terminate Channel on ICAP Scan Error setting controls how PrivX handles the affected SSH channel. To configure this setting, in the PrivX Web UI, go to Administration → Settings → SSH Bastion. By default, PrivX reports the error but keeps the channel open. Set the setting to True to terminate the channel.
Configuring ICAP Scan Directories
PrivX temporarily stores files on the PrivX Server while scanning them. By default, it stores these files under /tmp. If the /tmp partition does not have sufficient space, configure another directory for the temporary files.
SSH Proxy and SSH Bastion
SSH Proxy and SSH Bastion use separate settings and directories:
| Connection Type | Configuration File | Default Directory |
|---|---|---|
| SSH file transfers through the PrivX Web UI | /opt/privx/etc/ssh-proxy.toml | /tmp/ssh-proxy-drive/scan/ |
| SCP and SFTP file transfers with native clients | /opt/privx/etc/ssh-mitm.toml | /tmp/ssh-mitm-drive/scan/ |
To configure the ICAP scan directories:
-
Create the required directories in the environments where SSH Proxy and SSH Bastion run. Make sure that:
- Each configured directory exists.
- The directory has sufficient space for transferred files.
- The Linux permissions allow the
privxuser to read from and write to the directory. - The
privxuser can create files and directories under the configured path.
SSH Proxy and SSH Bastion validate their configured ICAP scan directories during startup. If a directory does not exist or the
privxuser cannot create files and directories under it, the affected service does not start and logs an error. -
In the TOML configuration for the corresponding service, set
icap_scan_directoryto the absolute path of the required scan directory. -
Restart the service to apply the changes.
RDP Proxy
For RDP file transfers, RDP Proxy stores files under its configured shared directory. To change the directory, in the PrivX Web UI, go to Administration → Settings → RDP Proxy and enter the required path in Shared directory.
Security of Transferred Files
PrivX stores and processes transferred files differently when ICAP scanning is enabled.
File Transfers Over RDP
| ICAP Scanning | File Handling |
|---|---|
| Disabled | PrivX writes transferred files to the connection-specific rdp-drive/ directory. If a file transfer is interrupted, this directory contains the partially transferred file. |
| Enabled | PrivX first writes transferred files to a connection-specific directory under the RDP Proxy shared directory, where the ICAP scanner reads them. You can configure this base path with Shared directory under Administration → Settings → RDP Proxy. After scanning a file, PrivX moves it to the connection-specific rdp-drive/ directory. |
File Transfers Over SSH
| ICAP Scanning | File Handling |
|---|---|
| Disabled | For uploads, PrivX streams the HTTP POST request body directly to the SSH connection's SFTP channel. For downloads, PrivX streams the file from the SFTP channel directly in the HTTP GET response body. PrivX does not store the transferred files on its servers. |
| Enabled | PrivX first writes transferred files to a connection-specific directory under the configured ICAP scan directory. SSH file transfers through the PrivX Web UI use the directory configured in SSH Proxy TOML configuration. SCP and SFTP file transfers with native clients use the directory configured in SSH Bastion TOML configuration. After scanning, PrivX continues the file transfer to the target or client. |
PrivX removes the connection-specific temporary directories from its servers when the connection closes.
When Session Recording is enabled, PrivX encrypts all file transfers before writing them to the trail. This also applies to partial file transfers. PrivX stores trails in the directory specified by the Data Folder setting of the Global Settings page.