Preparing for Deployment
This article describes the prerequisites of PrivX deployment.
System Requirements
This section describes the system requirements and specifications for PrivX system components.
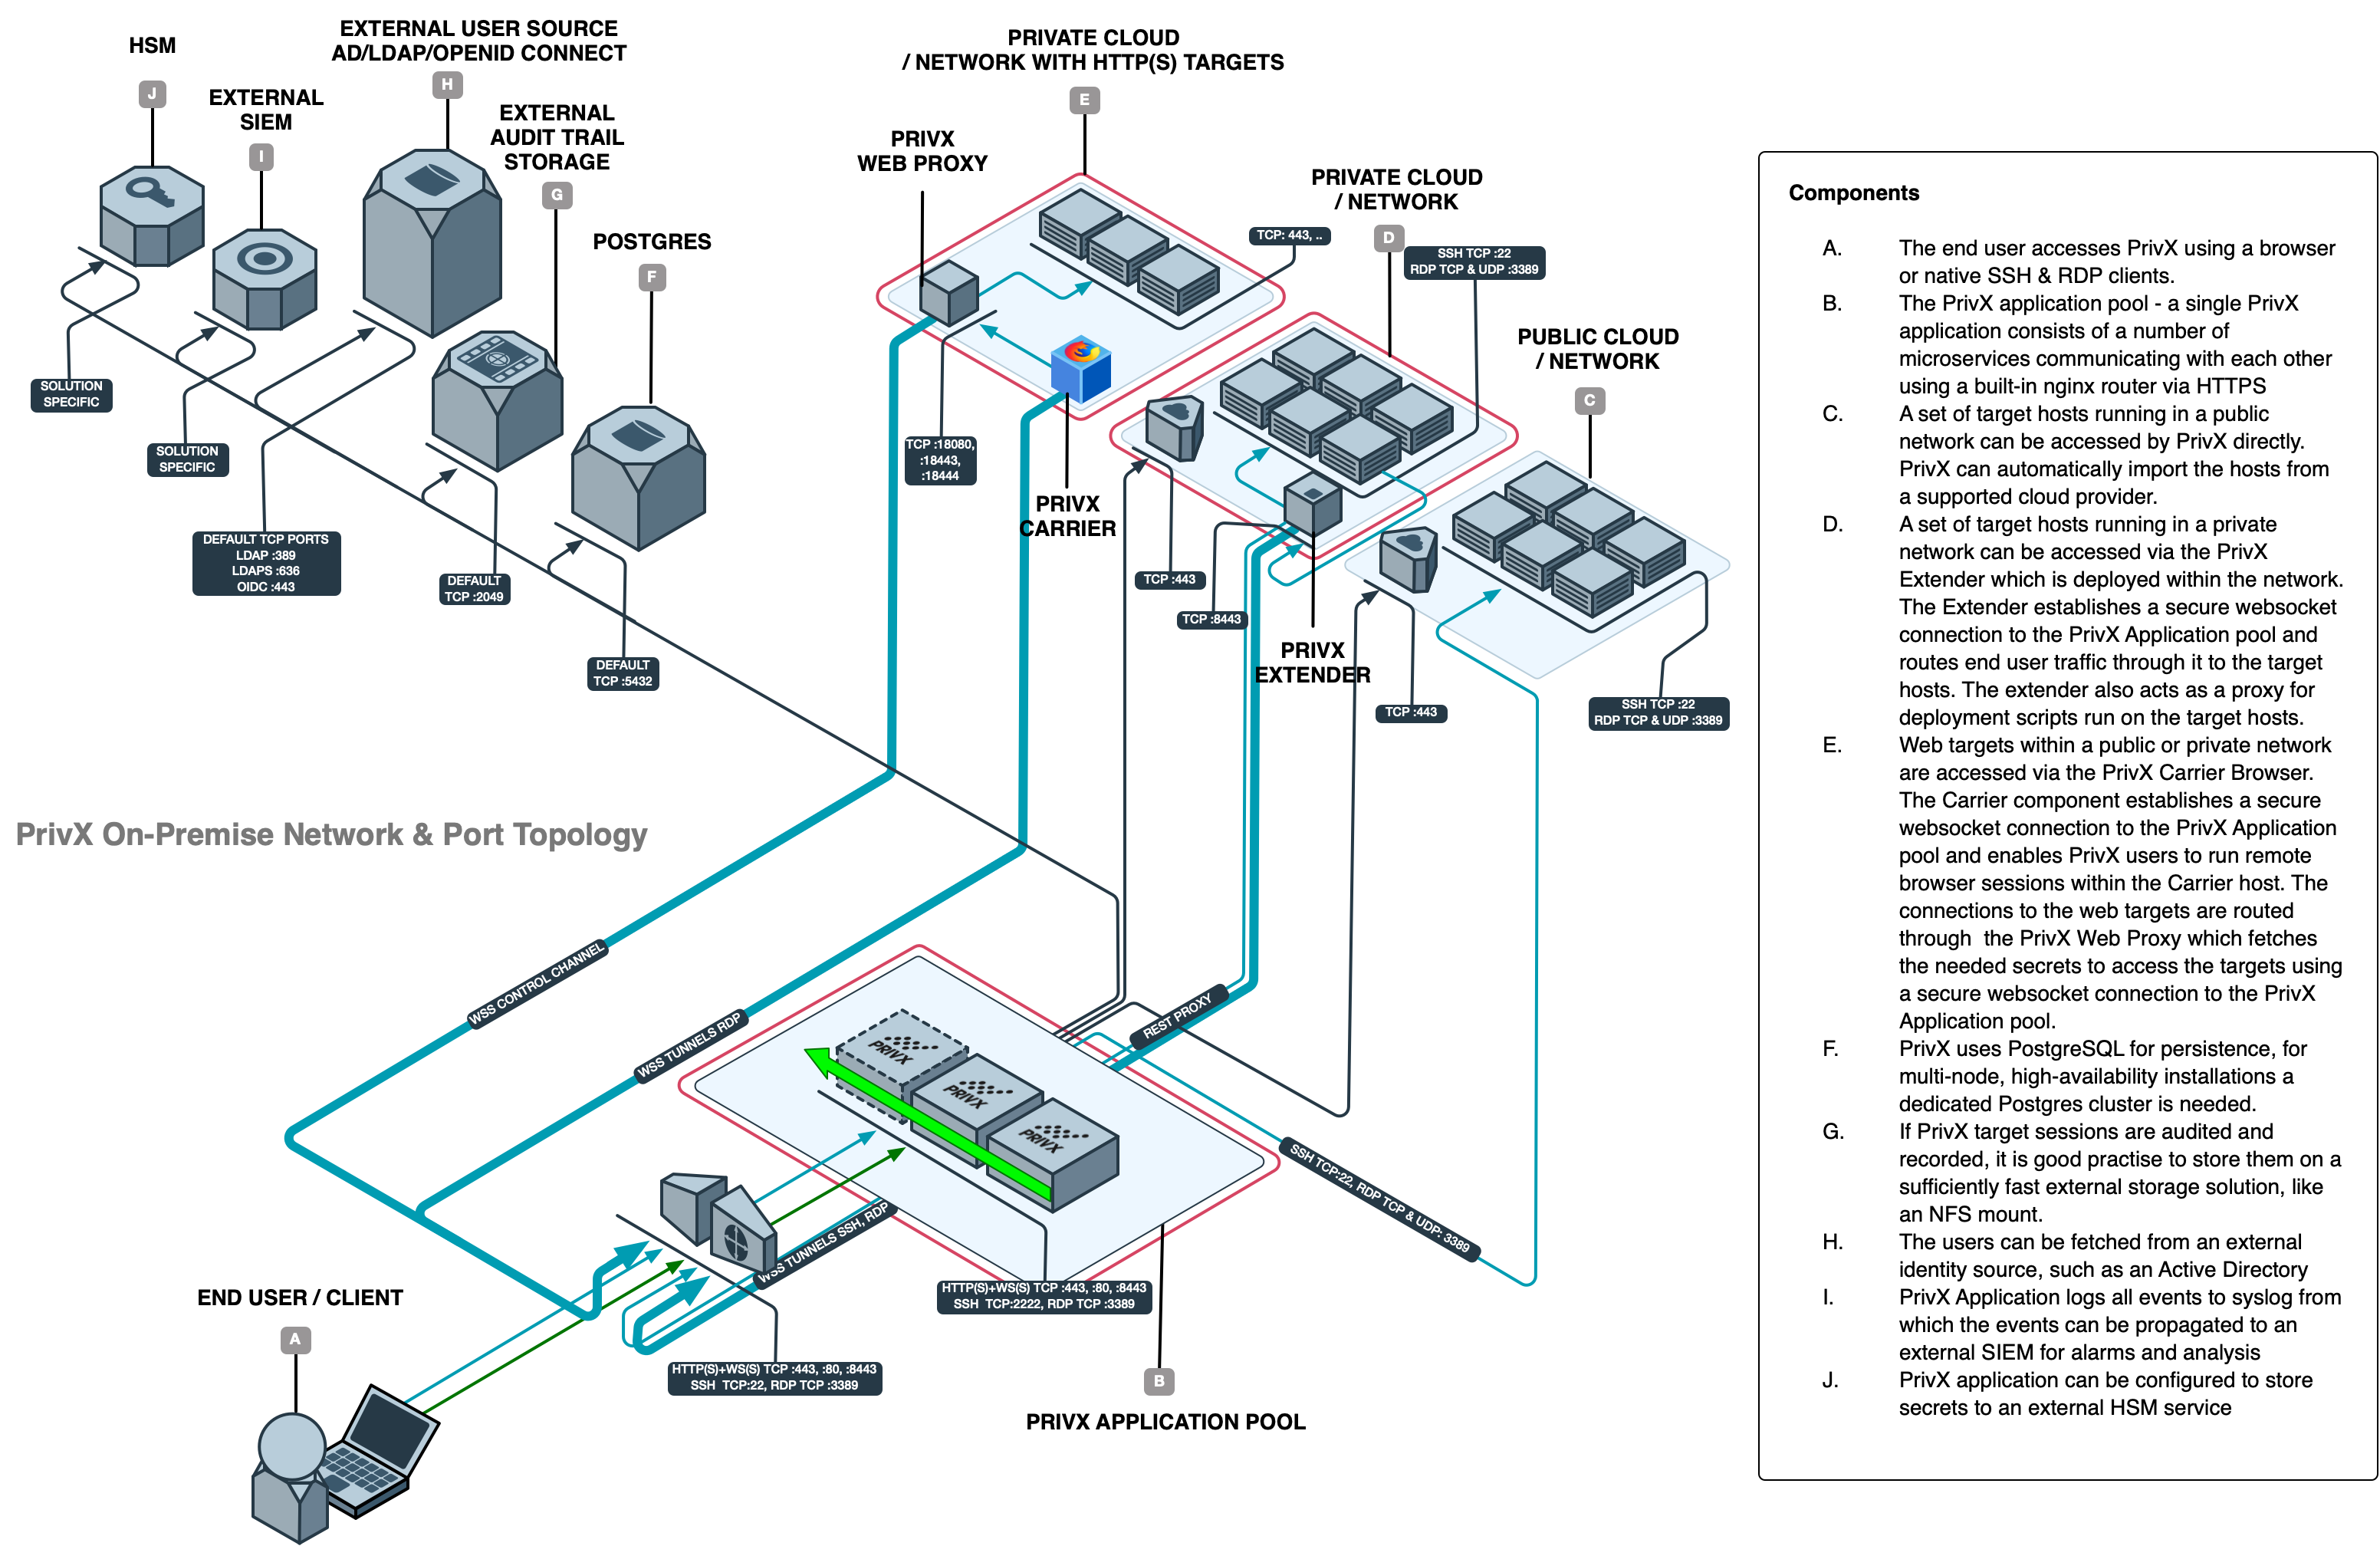
Mandatory Components
A PrivX deployment requires at least one PrivX Server to run PrivX services.
| PrivX Server | |
|---|---|
| System Configuration | 4 GB RAM, 2-core CPU, and 15 GB storage for < 10,000 users 16 GB RAM, 8-core CPU, and 100 GB storage for < 100,000 users |
| Supported architecture | x86-64 |
| Supported operating systems | Red Hat Enterprise Linux 8.x, 9.2 or later 9.x Rocky Linux 8.4 or later 8.x, 9.2 or later 9.x Amazon Linux 2023 |
| Supported databases | Local or external PostgreSQL version 12-17 (FIPS mode: PostgreSQL version 16 - 17) |
| Default Network Requirements | 80, 443 in: PrivX Web UI (80 for HTTP redirect) 80 in: RDP certificate CRL checks 1080 in: SSH Bastion proxy connections 2222 in: SSH Bastion 2322 in: Extender v2 3389 in: RDP bastion 8443 in: Client certificate authentication 20080 in: API Proxy 22 out: Outgoing SSH sessions 25, 465, 587 out: SMTP notifications 53 out: DNS 123 out: NTP 3389 out: Outgoing RDP sessions 5432 out: External PostgreSQL |
| Internet connectivity | For installing dependant libraries during installation and upgrades. License-server addresses for PrivX-license activation and verification (not required for deployments with offline license). - https://privx.license.privx.io - 52.49.87.37 - 54.74.201.253 To use the PrivX Authorizer app required for MFA and mobile approvals, PrivX Servers must be able to connect to the SSH Mobile Gateway cloud service: - https://mobilegw.privx.io:443 Verify that the endpoint is reachable and that the TLS handshake completes successfully. |
| Client experience | |
|---|---|
| Supported browsers | Latest versions of: Firefox Chrome Safari Edge - Allow cookies from PrivX. - On Chrome and Edge, disable sleeping tabs for the PrivX GUI. This prevents unintentional disconnects. |
| System Security | |
|---|---|
| [Optional] HSM support | SafeNet Network HSM Luna SA 5 Amazon Cloud HSM SoftHSM2 Entrust nShield Thales Vormetric Generic PKCS #11 provider |
| Target hosts | |
|---|---|
| SSH | Certificate-based authentication - OpenSSH 6.9 or later. For configuration instructions, see SSH Certificate Authentication or Script-Based Certificate-Authentication Setup. Tectia Server X.509 certificate user authentication RFC 6187 X.509 certificate user authentication Other authentication methods - OpenSSH 5.6 or later Tectia Server |
| RDP, certificate authentication | Windows Server 2012 R2, 2016, 2019, 2022 (with the latest service packs and updates) |
| HTTPS (through the Carrier component) | Stored credentials authentication. PrivX provides credentials the for target website on behalf of the user. OIDC authentication for supported websites. |
| VNC | Certificate authentication (using SSH tunnel) Stored credentials authentication |
| Network targets with custom protocols | Through PrivX Router |
Applications and users with access to a PrivX host might retrieve sensitive information from unprotected system memory. To protect sensitive information in system memory, run PrivX on dedicated hosts.
Expected System Performance
A PrivX Server that satisfies or exceeds the production requirements (16 GB of memory) is expected to support:
- 100,000 PrivX users total, with 700 concurrent users.
- Up to 1,000 hosts added or deployed concurrently.
- 20,000 cloud hosts discovered in 2 minutes.
- Up to 50 concurrent RDP connections for performing typical user operations. Graphically intensive sessions (including video streaming) may reduce the number of supported concurrent connections. Expected memory usage for RDP sessions is 90 megabytes per connection. Adding multiple PrivX instances to an HA setup will scale the number of concurrent users.
The PrivX microservice architecture supports multiprocessing and benefits from using multiple CPUs or multiple CPU cores.
Reserve enough space for the log data generated by PrivX. Monitor log data growth regularly. In large deployments, PrivX may generate a considerable amount of log data over time. Configure the PrivX Server to write its log data to an external logging server.
Optional Components
This section describes the system requirements and specifications for optional PrivX components:
- PrivX Extender
- PrivX Carrier and PrivX Web Proxy
- PrivX Router
- UEBA Server
- PrivX Authorizer app
Unless otherwise stated, for security purposes we recommend setting up all PrivX components on separate, dedicated hosts.
PrivX Extender
PrivX Extenders proxy connections to target hosts. Use PrivX Extenders to connect to hosts that PrivX Servers cannot access directly.
A PrivX Extender relays host connections, allowing connections to target hosts that are not directly accessible by PrivX, for example, target hosts without public IP addresses in a virtual private cloud or behind other NAT gateways. PrivX Extender acts as a reverse proxy, connecting back to PrivX instance through HTTPS endpoint, using either secure WebSocket connections (Extender v1) or SSH tunnels (Extender v2).
Only one extender per VPN or subnet is needed. The Extender relays connections to the target hosts.
| Extender | |
|---|---|
| System requirements | 4 GB RAM, 2-core CPU, and 15 GB storage |
| Supported operating systems | Red Hat Enterprise Linux 8.x or 9.x Rocky Linux 8.4 or later 8.x, 9.x Alma Linux 9.5 Extender in FIPS mode is only supported on RHEL/Rocky Linux 9 |
| Default network requirements | 443 out: PrivX connection 53 out: DNS 8443 in: Deployment proxy listener (for Extender v1) 10443 in: Deployment proxy listener (for Extender v2) 2322 out: PrivX connection for Extender v2 in normal mode When using Extender v2 in forward or passive modes, the listening port should also be allowed for inbound connections. Extender must be able to access target hosts and services. In HA setups, Extender v1 requires a web load balancer with sticky-session support and round-robin routing mode; while Extender v2 requires round-robin routing with sticky sessions disabled. |
| Internet connectivity required | For installing dependant libraries during installation and upgrades |
PrivX Carrier and Web Proxy
PrivX Carriers and PrivX Web Proxies together provide web functionality, that enable connections to HTTP and HTTPS targets through PrivX:
- Carrier offers auditable HTTP/HTTPS connections for users in a sandboxed environment. Roles control access to shared accounts.
- PrivX Web Proxy provides access control for HTTP/HTTPS connections and acts as a password manager for different sites.
Install PrivX Carrier and PrivX Web Proxy in pairs. For production environments, install PrivX Carrier and PrivX Web Proxy on separate servers. Install both components on the same server only in evaluation environments.
Carriers run a separate Firefox web browser in a Docker container for each user session.
By default, PrivX Carrier creates separate networks for Docker containers, but outgoing traffic from containers is unrestricted. To further secure the installation, configure a firewall rule that blocks outgoing traffic from the Docker network to all destinations except the PrivX Web Proxy host.
Using PrivX Carrier and Web Proxy requires a web load balancer with sticky session support and round-robin routing. PrivX-Carrier and Web Proxy Configuration
| Carrier | |
|---|---|
| System requirements | 64 GB RAM (250 MB - 1 GB memory per connection), 16-core CPU, and 100 GB storage for < 50 concurrent web connections |
| Supported operating systems | Red Hat Enterprise Linux 8.x, 9.x Rocky Linux 8.4 or later 8.x, 9.x |
| Default network requirements | 443 out: PrivX connection 18080, 18443, 18444 out: PrivX Web Proxy connections |
| Internet connectivity required | For installing dependant libraries during installation and upgrades |
PrivX Web Proxies and PrivX Carriers are both required to provide web functionality.
| Web Proxy | |
|---|---|
| System requirements | 4 GB RAM, 2-core CPU, and 15 GB storage for < 50 concurrent web connections |
| Supported operating systems | Red Hat Enterprise Linux 8.x, 9.x Rocky Linux 8.4 or later 8.x, 9.x |
| Default network requirements | 18080, 18443, 18444 in: Carrier connection 80, 443 out: Target host connections 443 out: PrivX connection |
| Internet connectivity required | For installing dependant libraries during installation and upgrades |
Web Carriers and Web Proxies cannot be installed on PrivX servers. In production environments, install PrivX Carrier and PrivX Web Proxy on separate hosts to ensure secure segregation between connection hosting and password/secret injection functions.
PrivX Router
Network targets are services, systems, or subnets that are accessible remotely using arbitrary TCP/IP protocols. Examples include operational technology such as PLCs, CNC systems, and scientific equipment.
To enable network target access:
- Configuring your network to route traffic between PrivX users and network targets through PrivX Router(s).
- This enables users to connect through PrivX Router to the relevant target server's IP address. For this, configure the relevant target server IP addresses as network targets.
- Setting up PrivX Routers to control user access to network targets.
- Adding network targets to PrivX.
| PrivX Router | |
|---|---|
| System requirements | 4 GB RAM, 2-core CPU, and 15 GB storage |
| Supported operating systems | Red Hat Enterprise Linux 8.x or 9.x Rocky Linux 8.4 or later 8.x, 9.x |
| Internet connectivity required | For installing dependant libraries during installation and upgrades |
The following figure describes the required network configuration for network target access:
- Users' connections to network targets must be routed through a PrivX Router.
- PrivX users can connect to PrivX for authentication.
- Access to other types of targets is still provided through PrivX as normal.
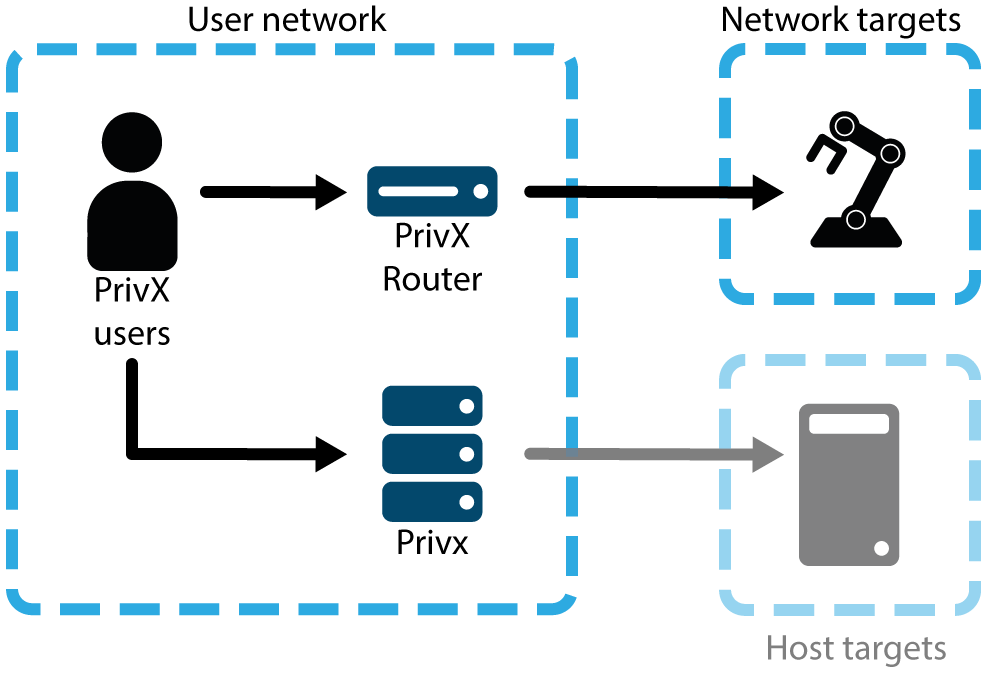
Use external security controls to protect user connections from untrusted networks. One common approach is to require users to connect to a secure network through a VPN. You can then configure the PrivX Router to only accept connections from the VPN IP address pool.
To ensure that all access to network targets is properly audited by PrivX, disable direct access to network targets:
- Route all traffic from user networks to target systems through the PrivX Router.
- [Optional] Configure NAT on the PrivX Router to hide devices on the target network. Ensure that no nodes other than the PrivX Router perform NAT.
For more information on network target access, see Network Target Access.
User and Entity Behavioural Analytics (UEBA)
PrivX UEBA automatically discovers anomalous SSH and RDP connections that deviate from regular connections. UEBA uses machine learning and probability distributions to calculate the probability of an anomaly based on connection data from PrivX.
PrivX issues audit events when it encounters a connection that seems anomalous. You can also configure PrivX to automatically block such connections.
To configure UEBA:
- Set up UEBA Server.
- Train EBA to distinguish normal and anomalous connections.
- Configure anomaly thresholds and behavior.
| UEBA Server | |
|---|---|
| System requirements | 8 GB RAM, 4-core CPU, and 32 GB storage |
| Supported operating systems | Red Hat Enterprise Linux 8.x, 9.x Rocky Linux 8.4 or later 8.x, 9.x |
| Default network requirements | 443 in: PrivX connection |
| Internet connectivity required | For installing dependant containers and libraries, during installation and upgrades |
| Software requirements | Docker Engine version 1.20 or newer installed and running. systemd and rsyslog services installed and running. |
| Server-certificate requirements | TLS certificate trusted by PrivX servers. TLS certificate must include UEBA server's IP and FQDN addresses in SubjectAlternativeName. |
For additional information related to user and entity behaviour analytics, see UEBA Configuration
PrivX Authorizer App
The PrivX Authorizer app enables multi-factor authentication (MFA) for PrivX logins. Using PrivX Authorizer as MFA requires connectivity to the PrivX Mobile Gateway cloud service. The service is operated by SSH.
To enable MFA with PrivX Authorizer:
- Your network configuration must allow PrivX to resolve and connect to the PrivX Mobile Gateway at
mobilegw.privx.io. - Configure PrivX to require MFA with PrivX Authorizer.
- Install and pair the PrivX Authorizer app on users' phones.
For more detailed instructions about setting up MFA with PrivX Authorizer, see Multi-Factor Authentication with PrivX Authorizer.
| PrivX Authorizer | |
|---|---|
| Supported operating systems | Android 10 and later iOS 13 and later |
MFA login is only supported for PrivX local users and LDAP/AD users. PrivX also supports Multi-Factor Authentication with 3rd-party Authenticators.
Database Requirements
For production environments, we recommend using an external PostgreSQL database:
-
Set up a PostgreSQL database instance. We recommend using a dedicated instance for PrivX.
-
PrivX servers require access to the PostgreSQL database. For PostgreSQL on Unix, edit the
pg_hba.confand add entries similar to the following:hostssl all all <privx_server_ip> scram-sha-256 -
Connections to the external PostgreSQL database must be SSL-protected:
- Enable SSL mode in your PostgreSQL configuration (ssl = true).
- Configure the PostgreSQL server with a certificate where the SubjectAltName specifies the DNS and IP address(es) of the server.
-
Configure each PrivX Server to trust the PostgreSQL server certificate: On each PrivX server, add the PostgreSQL server CA chain to the system trust anchors.
-
PrivX uses the configured PostgreSQL database to exchange notifications between microservices.
-
[Optional] The PostgreSQL database may be set up with the
pg_trigramextension, to enable Audit-Event Indexing for Faster Searches.
NTP Clock Synchronization
Machines for PrivX servers must have access to an NTP service for synchronizing system clocks. Use the same NTP service throughout the network.
Due to the just-in-time nature of the certificates issued by PrivX, clock skews greater than a few minutes may cause authorizations to fail.
HA-Installation Requirements
For High-Availability (HA) deployments, set up a load balancer to distribute connections to PrivX servers. Your load balancer must satisfy the following requirements:
- Each PrivX session must be handled by one PrivX server; load balancer sticky-session support must be enabled for some of the balanced ports, following the table below. Using PrivX Extenders v2 in normal mode requires that sticky sessions are disabled for the configured extender service listener port. A round-robin algorithm is required if using additional PrivX components (PrivX Extender or PrivX Carrier).
- For client-certificate authentication or SSH/RDP-Bastion connectivity, the load balancer must support TCP-level load balancing.
Load balancer routing requirements
| Traffic type | Default port on PrivX | Load balancing level | Load balancing method |
|---|---|---|---|
| HTTP user sessions | 80 | HTTP | sticky |
| HTTPS user sessions | 443 | HTTPS | sticky |
| HTTPS client-certificate authentication | 8443 | TCP | any |
| SSH Bastion | 2222 | TCP | hash |
| RDP Bastion | 3389 | TCP | hash |
| Extender Service SSH listener | 2322 | TCP | round-robin (must not use sticky sessions or hash) |
| API Proxy | 20080 | TCP | source |
For an HAProxy configuration that satisfies these requirements, see Example Load Balancer Configuration: HAProxy.
If the PrivX instance is accessible from the public internet and if you use port 3389, allow traffic only from known sources. As 3389 is the default port for Windows RDP traffic, it attracts a lot of unwanted attention from bot networks and may cause extra traffic and load for the PrivX deployment.
User-Directory Feature Support
Certain user-directory types and their users have limited support for some PrivX features.
| Access Types | Roles | Workflows | API Targets | User Creation and Discovery | |
|---|---|---|---|---|---|
| AD/LDAP | • Authorized-key • Passkeys • MFA with paired devices • Session-password login | Normal | Yes | Yes | On scan |
| Google Workspace | • Authorized-key • Passkeys • MFA with paired devices • Session-password login | Normal | Yes | Yes | On scan |
| Microsoft Graph | • Authorized-key • Passkeys • MFA with paired devices • Session-password login | Normal | Yes | Yes | On scan |
| Local | • Authorized-key • Passkeys • MFA with paired devices • Session-password login | Normal | Yes | Yes | Manual/Immediate |
| API Users | PrivX API | Normal | Yes | Yes | Manual/Immediate |
| OpenID Connect (OIDC), default | Session-password login | Dynamic | No | No | On user login; purged when the ID token expires |
| OIDC with Expire Implicit Roles | • Authorized-key • Passkeys • Session-password login | Dynamic | Yes | Yes | On user login; retained until purge delay |
| SCIM | • Authorized-key • Passkeys • MFA with paired devices • Session-password login | Dynamic | Yes | Yes | On push |
Role Behavior
Most user directory types support all methods for granting and revoking permissions. This includes gaining permissions through both mapped and approved roles. Approved roles can be permanent or time-restricted. User directories whose users follow this behavior with roles are marked as Normal.
For OIDC and SCIM users, mapped roles expire after the user's JWT token expires. These users must periodically log in to refresh their JWT tokens and regain their mapped roles. However, such users' approved roles function normally. The role behavior for these users is marked as Dynamic.
For OIDC directories, enabling Expire Implicit Roles keeps the user in the user cache after ID token expiration and expires only the user's implicit roles from OIDC role mappings. Explicitly granted roles remain available until they are otherwise revoked or expire.
Workflow Support
Users from all user directories except default OIDC fully support PrivX workflows. To enable workflows for OIDC users, enable Expire Implicit Roles in their OIDC directory's settings.
API-Target Access
Users from all directories except default OIDC can access API targets with account-specific API Proxy Credentials. To enable API-target access for OIDC users, enable Expire Implicit Roles in their OIDC directory's settings.
User Discovery and PrivX-Account Creation
The exact time when a directory user's PrivX account is created depends on the directory type. For AD, LDAP, Google Workspace, and Microsoft Graph, PrivX periodically scans the directory to detect users and any modifications to them. PrivX then automatically creates and/or updates the corresponding PrivX account.
For internal accounts, create local and API users accounts manually. Any created accounts are immediately saved and visible in PrivX.
OIDC directories do not support automatic user discovery. An OIDC user's PrivX account is created or updated only when they log into PrivX.
By default, PrivX purges the OIDC user when the user's ID token expires. If Expire Implicit Roles is enabled for the OIDC directory, PrivX can keep listing OIDC users that have logged into PrivX until User Purge Delay After Last OIDC Login (minutes) has passed and housekeeping removes the expired users.
PrivX cannot automatically fetch user data from SCIM. Configure SCIM directories to push user data to PrivX. PrivX then automatically creates and updates the corresponding accounts, as it does for AD and LDAP directories. Similarly to OIDC, a SCIM user login will trigger PrivX-account creation/update for that specific user.
HSM Integration
For added security, You can integrate PrivX with a hardware security module (HSM). This integration stores cryptographic keys in the HSM and uses an HSM secret to encrypt database and file system keys.
PrivX integrates with HSM providers using PKCS #11. For more information about setting up PrivX with HSM, see the Integration articles under HSM Providers.
Decide whether to use HSM before setting up PrivX. HSM support cannot be changed in existing PrivX deployments.
Keys Stored in HSM
The following types of keys can be stored in the HSM.
Asymmetric keys
- CA for issuing just-in-time certificates when users connect using certificate authentication.
- CA for signing server certificates.
- Role principal keys used in SSH for authorized key authentication to targets.
Only asymmetric keys of type RSA are stored in the HSM. Asymmetric keys of other types are stored in the PrivX key vault, which itself uses the HSM for encrypting the key material.
Symmetric keys
- Master key for encoding/decoding session recordings.
- Session-authentication keys.
- Keys for encrypting user and role data.
To store the default CA keys in HSM, your HSM must support the following key-pair-generation mechanisms:
| Key type | Mechanism |
|---|---|
| Certificate Authority (CA) keys | CKM_RSA_PKCS_KEY_PAIR_GEN CKM_RSA_PKCS |
| Symmetric keys | CKM_GENERIC_SECRET_KEY_GEN CKM_SHA_1_HMAC CKM_SHA*_HMAC (256/384/512) CKM_AES_KEY_GEN CKM_AES_GCM |
PrivX stores keys that the HSM does not support in the database or file system, but encrypted using the PKCS #11 instance secret located on the HSM.
Database/Filesystem Keys Encrypted by HSM Integration
Authentication-signing secrets and passphrases are stored in the PrivX database/filesystem. However, when HSM integration is enabled, such keys are encrypted using the PKCS #11 instance secret located on the HSM.
ICAP Integration
You can integrate PrivX with ICAP servers to provide virus and content scanning for users' connections. ICAP integration can be configured after initial PrivX deployment.
For more information about ICAP setup, see ICAP Servers.
GDPR Compliance
Since PrivX handles user data, that data will be classified as personal information, or Personally Identifiable Information. Ensure your GDPR compliance and inform your users of the handling of their data.
Product Limitations
- You cannot transfer folders through file transfer.
- Ctrl+W key-combination closes the open tab on Firefox.
- With RDP and Web connections, the clipboard size is limited to 256 KB.
- When RDP certificate authentication fails but the RDP server allows the user to lo gin using other accounts and credentials, then the subsequent authentication information will be lost because PrivX cannot detect what happens at the Windows login screen.
- Accounts with type configured as Directory are not available for connection through RDP native client.
- Certificate-based authentication is not supported through RDP native client.