Setting up Hosts
This section describes manually setting up hosts and connection targets on them. For information about importing hosts automatically using cloud host tags or deploy script, see Script-Based Certificate-Authentication Setup.
You can add connection targets to PrivX by adding hosts. To do this, go to Administration→Hosts and click Add Host. PrivX host entries are used for specifying, among other things:
-
Basic host information - Such as the host name and address(es).
-
Services - Available methods for accessing the host: SSH, RDP, and Web.
-
Accounts - Who can access the host, and as what identity. For example, allow members of Example Role 01 to log in as exampleuser on the host.
Connection targets offer the following benefits:
-
To see and connect to known targets, PrivX users can go to the Connections page and select Search from known hosts. PrivX users will only see those connection targets that they are authorized to.
-
Connection targets support additional authentication methods (instead of just user-provided password). For more information about the configurations required for additional authentication methods, see Supported Authentication Methods.
-
Allow auditing connections. If auditing is enabled for the host, administrators are able to view recordings of completed connections.
-
PrivX can periodically check the status of known targets and indicate when targets are unreachable. Settings related to status checks are under the Service health check section on Administration→Settings→Host Store.
All known targets must have unique machine IDs: If you need to add cloned machines to PrivX, ensure the uniqueness of the machine's ID and regenerate it if necessary.
Proxying Connections
For target hosts that are inaccessible from PrivX servers (such as hosts in protected networks), you may use PrivX Extenders for relaying connections.
To proxy connections to the host via Extenders, go to the Settings add either of the following to the host Address:
- An Extender name: Connections to the host are proxied via the named Extender.
- A Routing prefix: Connections to the host are proxied via an Extender HA cluster.
Example Address syntax in IPv4 and IPv6 format:
exampleextender/192.0.2.100
exampleextender/2001:DB8::64
Save your host changes. Subsequent connections to the host are proxied via the PrivX Extender.
For more information about PrivX-Extender requirements and setup, see PrivX Extender and Setting up PrivX components respectively.
SSH Targets
You can use the PrivX host-deployment script to automatically add SSH targets (while also enabling certificate-based authentication). For more information about using the host-deployment script, see Script-Based Certificate-Authentication Setup.
To allow connections to SSH hosts, add a host entry with the following considerations in mind:
-
Add a Service with the type SSH, specifying the address and the port of the SSH server on the host.
When the Trust on first use option is disabled, SSH host keys must also be added here. In this case regular PrivX users can connect only if the host key matches one of the provided values. PrivX administrators can establish connections even if the host key is missing or incorrect.
-
Add Accounts specifying which PrivX roles may access the host, and which target accounts they are given access as.
The access options of the accounts can be limited under Allowed Service Options
By default all Allowed Service Options are enabled. The default values can be changed in Administration→Settings, under the Hoststore category.
RDP Targets
To allow connections to RDP hosts, add a host entry with the following considerations in mind:
-
Add a Service with the type RDP, specifying the address and the port of the RDP server on the host.
-
Add Accounts specifying which PrivX roles may access the host, and which target accounts they are given access as.
The access options of the accounts may be limited under Allowed Service Options.
By default all service options are enabled. The default values can be edited on Administration→Settings→Host Store.
You may also provide Windows application restrictions, for limiting users to certain applications. Note that the target Windows host must be configured to allow the listed applications to be used over RDP.
-
You may enable legacy-cipher support and adjust the minimum and maximum allowed TLS versions under Additional Settings.
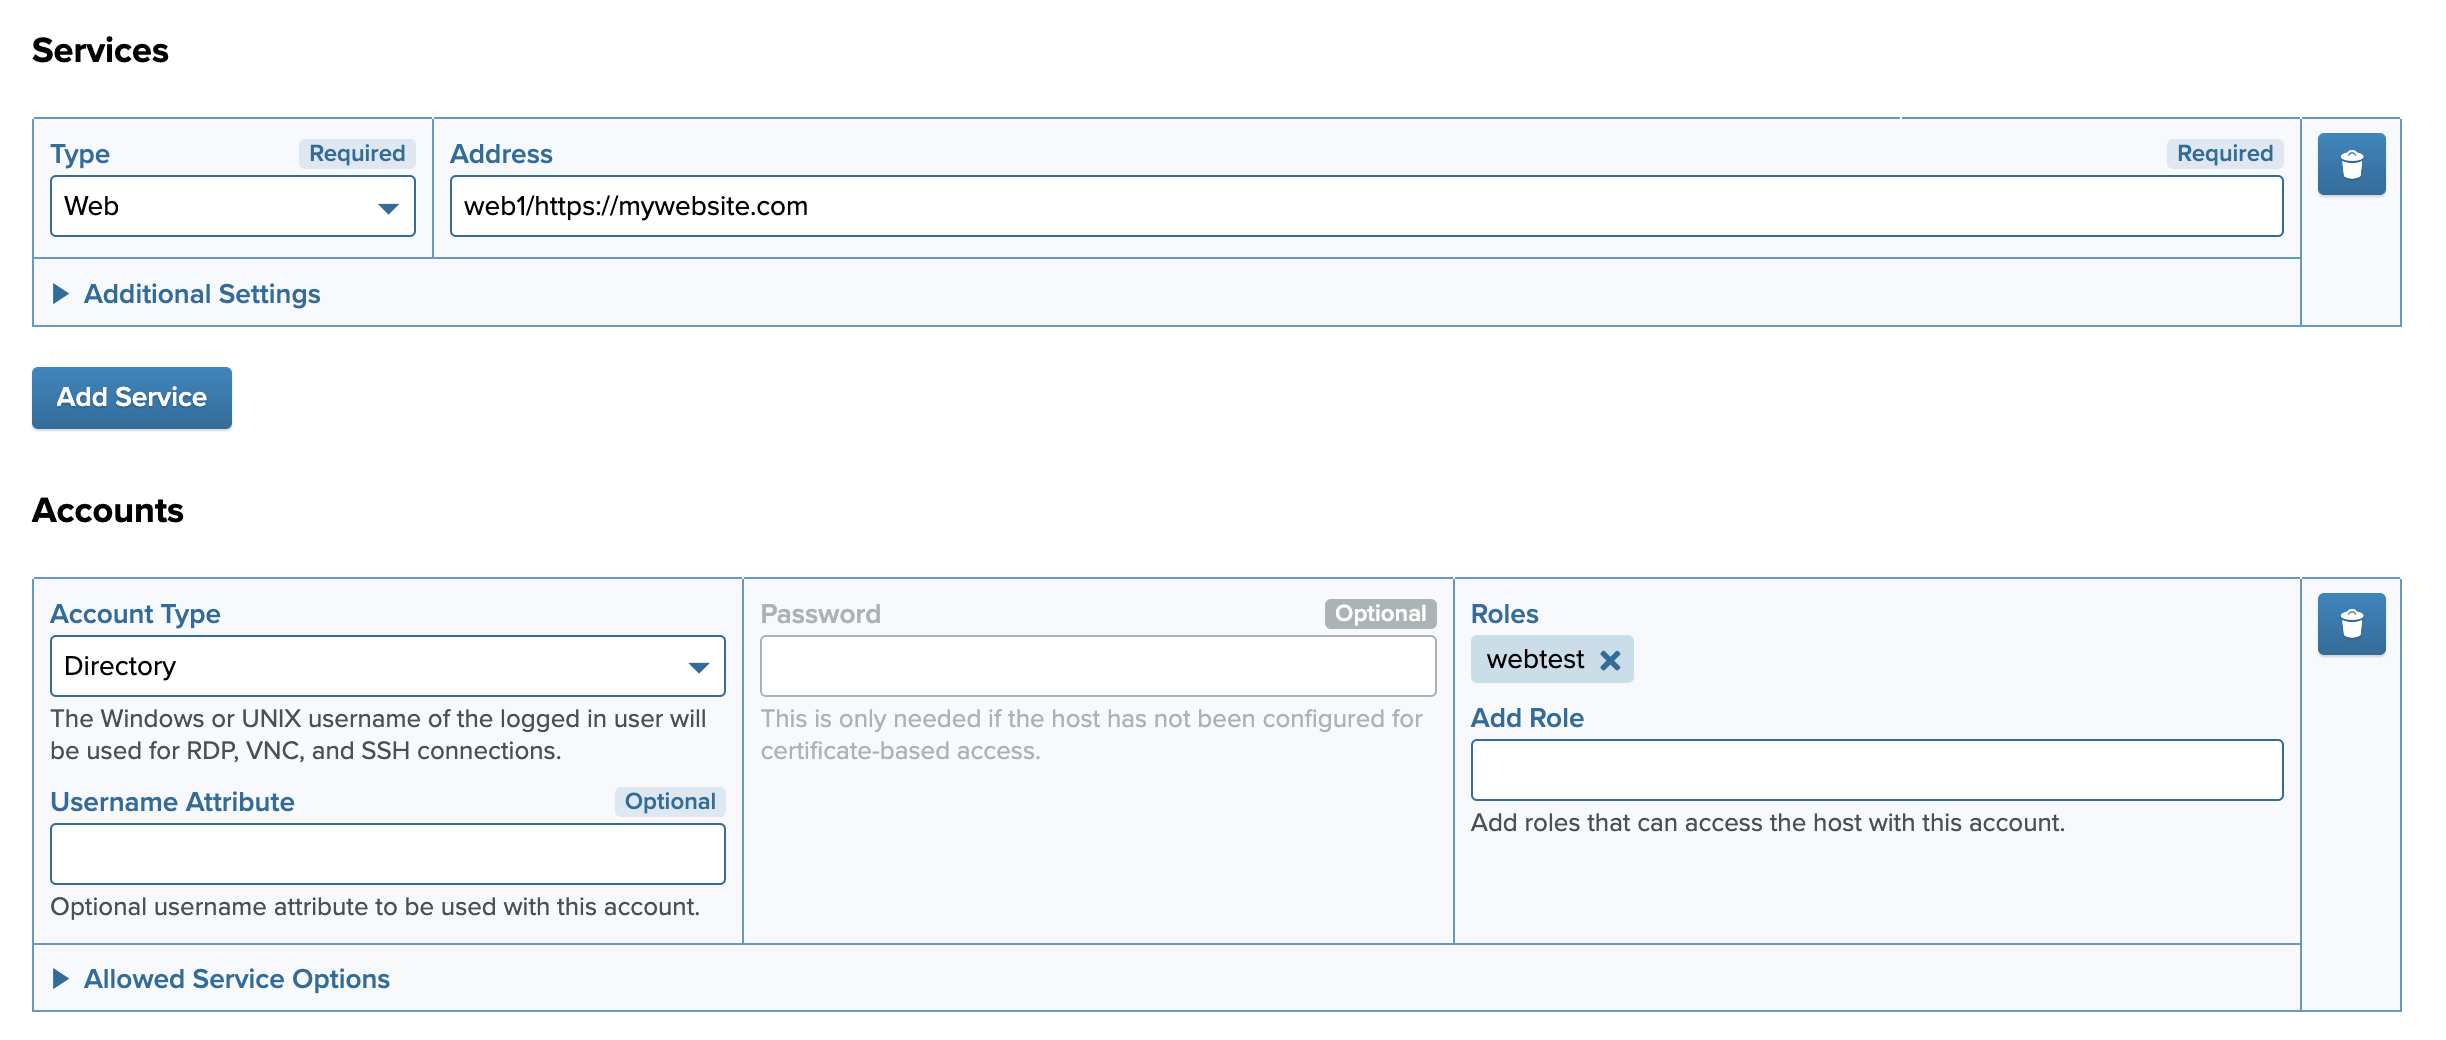
Web Targets
You can use PrivX to connect to websites. To allow connections to websites, add a host entry with the following considerations in mind:
- Add a Service with the type Web, specifying the address of the website.
Since connections to web targets are provided via a PrivX Web Proxy, you need to provide the address in proxy format. For example (replace exampleproxy with your Web access gateway name, and https://www.example.com/ with the address of the website):
exampleproxy/https://www.example.com/
Replace the example values as follows:
- exampleproxy: The Name or the Routing prefix of the web-access gateway(s) used for proxying the connection.
- https://www.example.com/: The address of the website.
If you want PrivX to automatically fill in login credentials for the website, also provide the following Additional settings:
-
Login-request address: The verified address of the login request. For example, in form logins this may be the URL of the webpage plus the URL specified by the
actionattribute of the form. Recommended for improved security. -
Password property: The verified
idof the password field in the login form. Recommended for improved security. -
Login-page address: The login-page address. Only needed if the login page is not under the Address of this web service. For example, while you could have an AWS service with the Address:
exampleproxy/https://example.signin.aws.amazon.com/consoleThat website may redirect you to a different address for login:
https://us-east-1.signin.aws.amazon.com -
Authentication type: Set to Automatic for most websites, such as websites using forms for authentication. Set to Basic for websites using the Basic HTTP Authentication Scheme (defined in RFC 7617).
-
Username-field name: The
nameof the username field in the login form. Only required if PrivX is unable to automatically detect this field. -
Password-field name: The
nameof the password field in the login form. Only required if PrivX is unable to automatically detect this field. -
Add Accounts specifying which PrivX roles may access the website. If you want PrivX to automatically fill in login credentials for the website, also provide Usernames and Passwords in the account mappings.
The access options of the accounts can be limited under the Allowed Service Options
By default all service options are enabled. The default values can be edited on Administration→Settings→Host Store.
When set up to do so, PrivX automatically fills up login credentials, but will not actually log into the web service. Users must manually click any Login buttons to log in.
For HTTPS targets, by default PrivX only allows connections using TLSv1.2 and later. To use TLS 1.3 with Carrier HTTPS connections, your PrivX web proxy host needs to be using RHEL8 compatible environment with OpenSSL 1.1.1 or later.
To prevent users from accessing websites other than the intended web targets, configure additional access rules, as described in Access Restrictions for Web Connections.
- If your web service supports OIDC authentication, you can configure it to use PrivX as an OIDC identity provider. This way, you won't need to provide any credentials for the target web host.
To configure PrivX as an OIDC IDP, refer to the OIDC Identity Providers documentation.
To enable OIDC, you need to configure the PrivX web host to use the Directory account type. Make sure your user account has "unix_username" attribute defined in user details or the web target will not visible in PrivX UI.
Using OIDC login for web target
If you want to ensure that all OIDC logins through PrivX OIDC IDP are routed through PrivX Carrier for auditing purposes, enable the "Only allow login attempts via Carrier" option on the OIDC IDP configuration page.
VNC Targets
To allow connections via VNC, add a host entry with the following considerations in mind:
-
VNC connections are tunneled over SSH. For this reason you must first add a SSH service, as described in SSH Targets.
-
Add a Service of type VNC, specifying the address and the port of the VNC server on the host. Also ensure that SSH tunnel port under Additional settings matches that of the SSH service.
VNC file transfers are tunneled over SFTP using the specified SSH service.
If there is no SSH service for the VNC service, you can still establish VNC connections with the connections-manual permission. In such cases, you will be prompted for hostkey acceptance and SSH password (similar as with manual SSH connections). After successful password authentication VNC connection proceeds normally.
Database Targets
To allow connections to target databases, add a host entry with the following considerations in mind:
- Add a Service with the type DB, specifying the address and the port of the database server on the host.
- Select the appropriate database wire protocol or passthrough mode, and configure the TLS Certificate Validation mode and database server TLS certificate trust anchor certificates under Additional Settings.
- If you are using either Passthrough or TLS protocol then you should configure a suitable value for Audit Skip (Bytes) to skip session recording from the beginning of the database protocol stream, in which the database credentials are typically sent. You will need to find a suitable value for Skip Bytes for the database wire protocol you are using.
- Add Accounts specifying which PrivX roles may access the host, and which target database accounts they are given access to.
Connection specific Upload / download byte limits can be set under Database Settings.
Account Types
The following account types are available for granting access to target hosts:
-
Explicit - Allow access to a certain user. Choose this option when defining a web target.
-
Directory - Allow access to the users' Windows username or Linux username. For PrivX directory users these default to their userPrincipalName and sAMAccountName respectively.
-
User-defined - Allow users to input the username when connecting. Similar to manual connections, except restricted to the target host.
If the provided user name matches other Account entries, then the most-preferred authentication method among matching Accounts is used for login. Otherwise the user is prompted for password.
For example, if a host has the following Accounts:
- Explicit: Example role 01 to alice with certificate authentication.
- User-defined: any role to any account with user-provided passphrase.
Then if a member of Example role 01 connects with the user-defined rule and provides alice as the user name, the explicit rule is considered matching, and certificate authentication is used since it is preferred over user-provided password.
For more information about the preference order of authentication methods, see Supported Authentication Methods.
Automatic Account and Home Directory for Directory Users
This section describes additional configurations that may be required for allowing directory users to access hosts with their personal accounts.
These instructions assume you have set up PrivX to provide access to personal accounts: You have either deployed hosts using the host-deployment script with --personal-account-roles settings, or you have manually set Directory-type Accounts to Hosts in PrivX.
SSH Connections to Unix
By default, directory users who have been granted access via PrivX still need the following before they can access target hosts successfully:
- The PrivX-user's Unix account must be recognized on the target host. To accomplish this, configure the target host to support logins from the corresponding user directories.
- The user's home directory should be created during their initial login.
For example, to satisfy these requirements on a Debian-based host for AD users:
-
Install LDAP name services such as
libnss-ldapdandnslcd -
In
/etc/nslcd.confProvide your AD-query parameters including server address, bind credentials, search base, and SSL options.Example
/etc/nslcd.conf:# The user and group nslcd should run as.uid nslcdgid nslcd# Replace with the address of your AD serviceuri ldap://ad.example.com# Replace with the base DN for querying usersbase CN=Users,DC=example,DC=com# Replace with your bind credentialsbinddn Administrator@example.combindpw example_password# Replace with your SSL optionsssl start_tlstls_reqcert demandtls_cacertfile /etc/ssl/certs/ca-certificates.crt# The search scope.scope sub# Filter for finding usersfilter passwd (objectClass=person)# You will need to map Unix attributes if they do not exist in your ADmap passwd uid sAMAccountNamemap passwd homeDirectory "/home/$sAMAccountName"map passwd gecos displayNamemap passwd uidNumber unixUIDmap passwd gidNumber unixGID -
Allow LDAP authentication in the NSS configuration
/etc/nssswitch.conf: You will at least need to addldaptopasswd,group, andshadow.passwd: compat ldapgroup: compat ldapshadow: compat ldap -
Restart the relevant services such as
nscdandnslcdto apply your configuration changes.The host should now recognize users from the AD directory. You may verify this by running the following on the host:
getent passwd
If getent passwd is not returning AD users, try running the LDAP name service nslcd in debug mode:
systemctl stop nscd nslcd
nslcd -d
Then run getent passwd again and check the nslcd debug output for potential causes (such as bind failures, or missing user attributes).
After you are done debugging, remember to restart the LDAP name services normally:
The command should list your AD users.
-
Automatic home-directory creation is handled by the PAM module
pam_mkhomedir, therefore you must enable PAM authentication on the OpenSSH server. You can do this with the following settings in/etc/ssh/sshd.conf:ChallengeResponseAuthentication yesUsePAM yes -
To set up automatic home-directory creation, run running
pam-auth-update, and enable Create home directory on login.Restart OpenSSH server to apply the changes.
PrivX-users with personal-account access to the host should now be able to log into the target host.
RDP Connections to Windows
To automatically create users and user home folders on Windows hosts, set up RDP-certificate authentication as described in RDP Certificate Authentication.